Would you like to take better food photos?
Most of us have experienced an instant hunger when looking at the mouth-watering photos in food magazines. Have you ever wondered how these photographers achieve such good results?
What camera gear and light sources do they use? How can I compete with specialized teams of photographers, food stylists, gourmets, and cooks?
Well, If you’re serious about food photography then stay tuned and read further to discover the secrets behind the scenes!!
Products in this post
1.Select the right gear

©karelnoppe photography_Extreme close up of smoked salmon morsel catering. 
©karelnoppe photography_Macro close up of Lobster with orange caviar and seafood dressings. 
©karelnoppe photography_Extreme close up of grilled giant langoustine brochettes. 
©karelnoppe photography_Macro close up of King prawns with crisp seafood rice. 
©karelnoppe photography_Macro close up of fresh salmon filets layed on crushed ice with lemon and greens in background.
Choose the right gear to create appealing food photos.
Everyone with their smartphone could simply point and shoot at any dish. In most cases, the result could be quite acceptable, especially when viewed on a screen.
Until you compare the smartphone shot with a DSLR Camera, equipped with a telephoto lens, you realize there’s a big quality difference. I often use a smartphone myself, but only for some reference pics.

So my number one tip is to use a quality DSLR Camera like the Canon EOS 5D Mark IV, Canon EOS 7D Mark II, or Mirrorless cameras like Fuji XT 4 or Sony Alpha A7 111. You’ll also need a telephoto lens like the Tamron SP 90mm F/2.8 Di VC USD Macro or Sigma Macro 105mm f/2.8 EX DG OS HSM.
Remember our goal is to shoot high-quality food images and these cameras, with bigger sensors allows more light to enter and guarantees better image quality. I use telephoto lenses in more than 99% of my food photography.
My all-time favorite is the stunning Canon Macro Lens EF 100mm 1:2.8L IS USM with a minimum focus distance of 0,3m and an extraordinary sharpness and contrast. The macro lens is crucial and allows capturing details impossible to shoot with a normal lens. Definitely worth the investment.!!
Another important piece of equipment is a steady tripod like the Manfrotto 190 XPro Carbon witch is very lightweight or the heavier Manfrotto 161MK2B Super Pro Tripod for studio or at-home shoots.
The 3rd component is strobe lightning and the list is endless. It could be anything from a professional Studio Flash-like Elinchrom D-Lite RX-400w, a dedicated off-camera flash, or even LED lights.
I use the Elinchrom Ranger Quadra RX Hybrid Pro flashes when traveling. The ranger series is very compact and portable.
I also make use of the Canon Speedlite 470EX-A1 and Speedlite 600EX 11-RT on occasions with Pocketwizard Flex TT5 transceiver and Pocketwizard Flex TT1 controller and transmitter for better control and off-camera positioning.
With these “basic” quality Photographic “gadgets” we’re ready to approach any food situation!!
2.Choose your light sources
Indirect natural light is my very first choice of light source for food photography. A typical photoshoot setup would be in front of a window with soft natural light used as my main light.
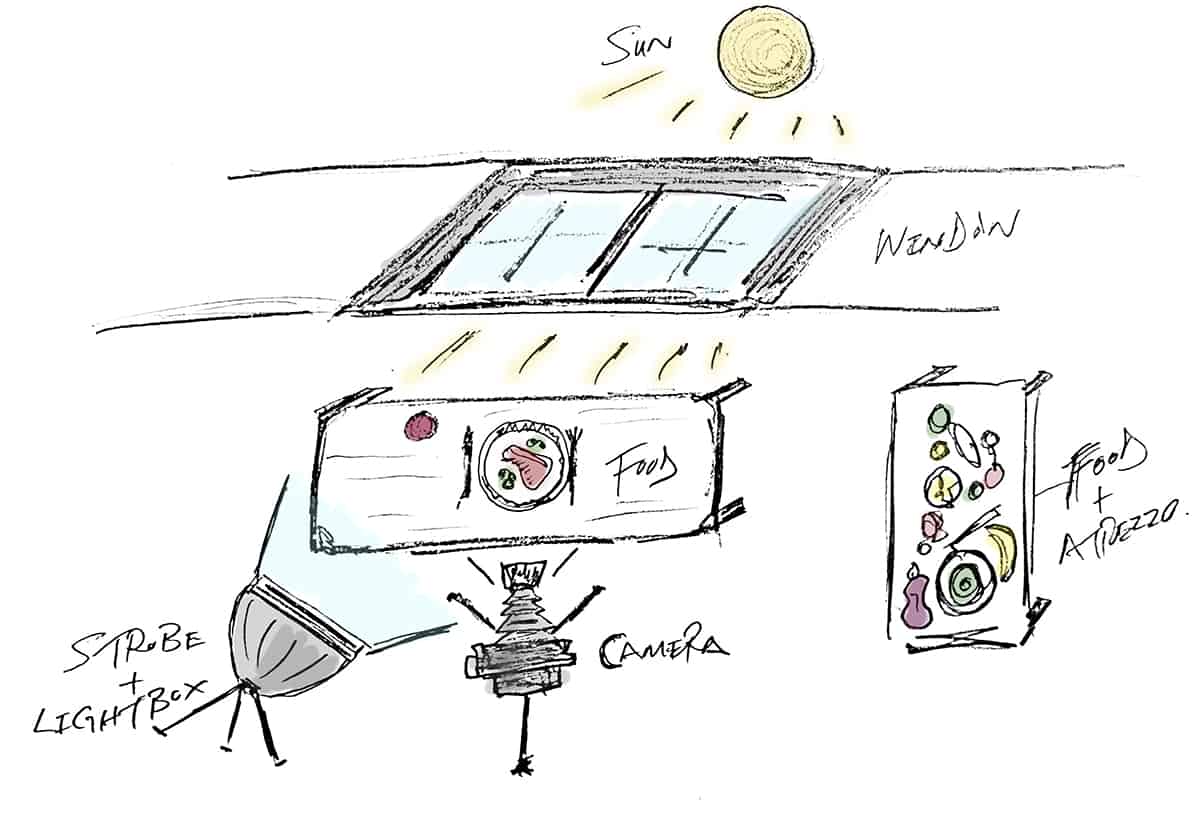
Modify natural light for the most flattering food photos
Keep in mind that the light direction and color temperature may change over time when shooting for several hours. Depending on which season and time of the day I have several windows in different parts of the house ready for a shoot setup.
Comparing image results shot at the same time and location in January and in June, will differ in color temperature, intensity, and direction.
My secondary light, used to fill dark shadows could be a Studio Strobe, electronic flash mounted off-camera, or a white reflective board. I hardly make use of direct harsh light and all strobes and flashes are mounted with softboxes like the GODOX Softbox 80cm Octagonal or Elinchrom Rotalux rectabox 60 x 80 cm.
Reflective boards like the Impact 5-in-1 Collapsible Oval Reflector are very versatile and I use them for bounce and diffuse light.

©karelnoppe photography_Macro close up of appetizing chocolate brownie with dark chocolate dressing and vanilla ice cream against black background. 
©karelnoppe photography_Close up of fresh tuna and salmon sashimi on black plate. 
©karelnoppe photography_Extreme macro close up of cut piece of cured Spanish bellota pork ham on tweezer.
3.Selection of ingredients and Atrezzo
Before the actual photoshoot, I generally do some online research on products, recipes, and ingredients. Getting inspiration from other photographers and illustrations could only help in your own creative process.
The more knowledge you have the more creative you’ll get!!
Another good way of getting to know the real product is dining out in diverse restaurants.
Planning is important and helps to create a timeline when working with hot and cold dishes.
Running around an unorganized set could ruin the photo shoot completely.
Carefully select your own products like fruit, vegetables, or fish to avoid imperfections and bad quality. This also reduces retouching in post.
Pay attention to cooking times as some ingredients need to be cooked in advance. If you’re shooting cold drinks you might consider buying fake ice cubes. Working with real ice is tricky and leads to frustration.
This post is not an in-depth guide to elaborating on different dishes, as the list is infinite. I might do a specific post on that subject.

Sometimes I also team up with Gourmet chefs from local Restaurants for a shoot. Those with good criteria and exceptional style could be a good choice for a profitable symbiosis.
These shoots are more relaxed, when at leased the cooking and selection of ingredients are done by a master chef.
The cooking time to achieve this perfect crispy pork ribs color and texture was crucial.
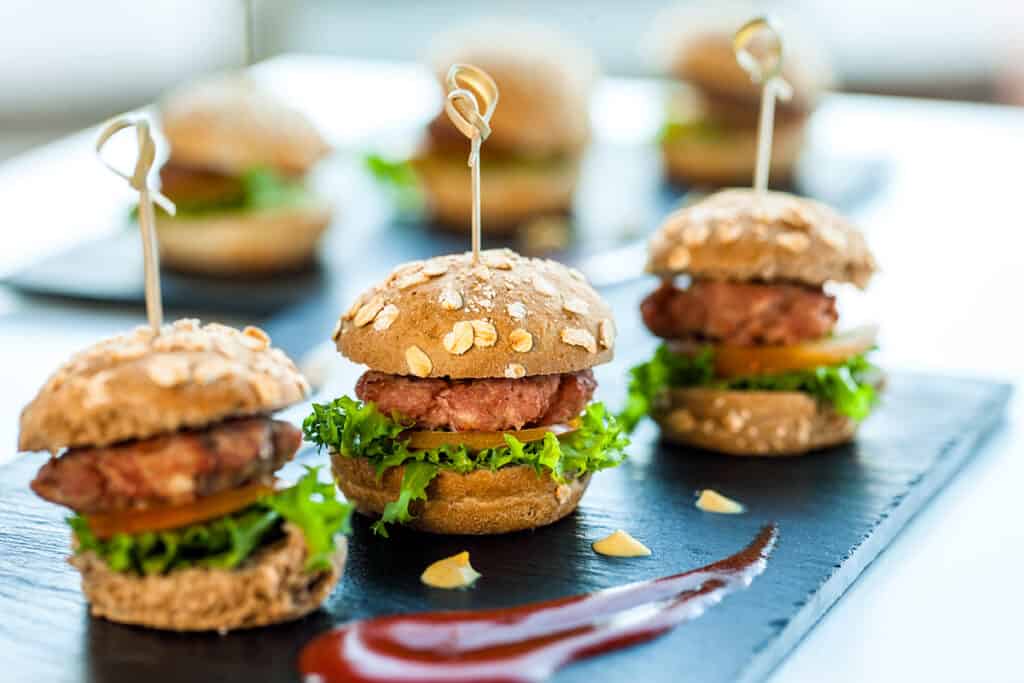
4.Composition and mood
The composition and mood of your food photography depend on its content and intention. The approach to shooting a hamburger for Macdonald’s or a local catering service could be quite opposite.
An extreme close-up of a complex hamburger with many ingredients would take much more time to prepare and shoot, compared to a more plain hamburger for catering.
Try different camera angles to maximize the prospective possibilities. Sometimes I even use various backdrops for the same dish.
Selective focus using big aperture settings immediately grabs people’s attention. Avoid clutter for distraction and keep things simple.
Indirect natural window light can also be manipulated to create more dramatic lighting. Blocking light direction and intensity can emphasize certain areas of the image.
Accurate colors are important in most photographic situations but of utmost importance in food photography. Choose an eye-catching color palette to create impact. Websites like https://coolors.co/ or Canva could help to make thoughtful decisions.
But Before the first shot, I use the Lastolite LL LR1250 30cm Ezybalance Grey Card to manually set the correct exposure and white balance on the camera. All modern cameras have Auto white balance settings but may fail at times. Daylight temperatures may vary from 5000K ( Noon) to 7000K ( cloudy or shade ) and setting the correct white balance saves time in post.

5. Post-production
Getting the shot “right in camera” not only saves time in the post but also guarantees the full camera resolution potential for the best quality. For me, cropping the image is not an option.
I know some professionals even make use of more radical ways like the painting of ingredients to enhance certain areas. That’s not an issue and after all, what matters, is the end result.
Sometimes a little olive oil or water spray on a salad does the job just as well.
My own postproduction workflow though is only limited to Adobe Camera Raw and Adobe Photoshop.
Adobe Camera Raw is very user-friendly to get familiar with. In this screen capture clip, I’ve done some basic color corrections and editing. Judge for yourself!


I use Adobe Photoshop to retouch scratches and dust, delete brands’ names, or any other minor imperfections. Editing images on the screen for several hours could accustom the human eye and mislead the correct color perception.
Duplicating the same image with different fine-tuned color gradings could solve this problem when viewed as a group after a while.
This is a short Jpeg vs Raw image editing comparison in Adobe Camera Raw.
Music by Lesfm from Pixabay
Last thoughts…
There may be alternative workflows to get good or even better results, but these basic guidelines work for me. Using different Camera gear, lightning techniques and computer skills could heavily influence image results.
Practice makes perfect!! You may also like my post on How to be successful with stock photography or How to shoot a $1000 best seller photo.